Bonus - Using ethers js with MetaMask in React
Following examples are written in React. If you are not familar with React, you can still follow along by reading the code and understanding the concepts. We will talk React in details in the future.
Communicate with MetaMask using ethers.js
Import ethers
Put the following code in index.ts:
import { ethers } from "ethers";
Connect to MetaMask
window.ethereum is a global variable injected by MetaMask. It is the
interface to the Ethereum network. You can read more about it
here.
const provider = new ethers.providers.Web3Provider(window.ethereum);
Get the signer
A signer is an object that can sign transactions and messages. It is responsible for sending transactions to the network. You can read more about it here.
// MetaMask requires requesting permission to connect users accounts
await provider.send("eth_requestAccounts", []);

// The MetaMask plugin also allows signing transactions to
// send ether and pay to change state within the blockchain.
// For this, you need the account signer...
const signer = provider.getSigner();
Some properties of the signer:
// The signer address
const signerAddress = await signer.getAddress();

// The signer balance
const signerBalance = await signer.getBalance();
React states
React states are used to store data that can be changed over time. Using state, we can bind the data to the UI and update the UI when the data changes. We will use them to store the signer address and balance.
Import useState
import { useState } from "react";
Create states
const [signerAddress, setSignerAddress] = useState("");
const [signerBalance, setSignerBalance] = useState("");
Update states
setSignerAddress(await signer.getAddress());
setSignerBalance(await signer.getBalance());
React callback
React callback is used to call a function when a button is clicked.
We will use it to call the getSigner function.
Import useCallback
import { useCallback } from "react";
Create callback
const onClick = useCallback(async () => {
  await provider.send("eth_requestAccounts", []);
  await provider.getSigner();
}, []);
React Component
React component is used to create a reusable UI element. We will use it to create a button to connect to MetaMask. The syntax is similar to HTML tags.
Create a component
Create a Component named WalletApp and it will display a button to connect to MetaMask.
It will also display the signer address and balance. But currently it has no data to display and button is also not working.
Add Callback function to the WalletApp
We will bind the onClick callback to the button so that it will be called when the button is clicked.
And now you will see the metamask popup when you click the button.
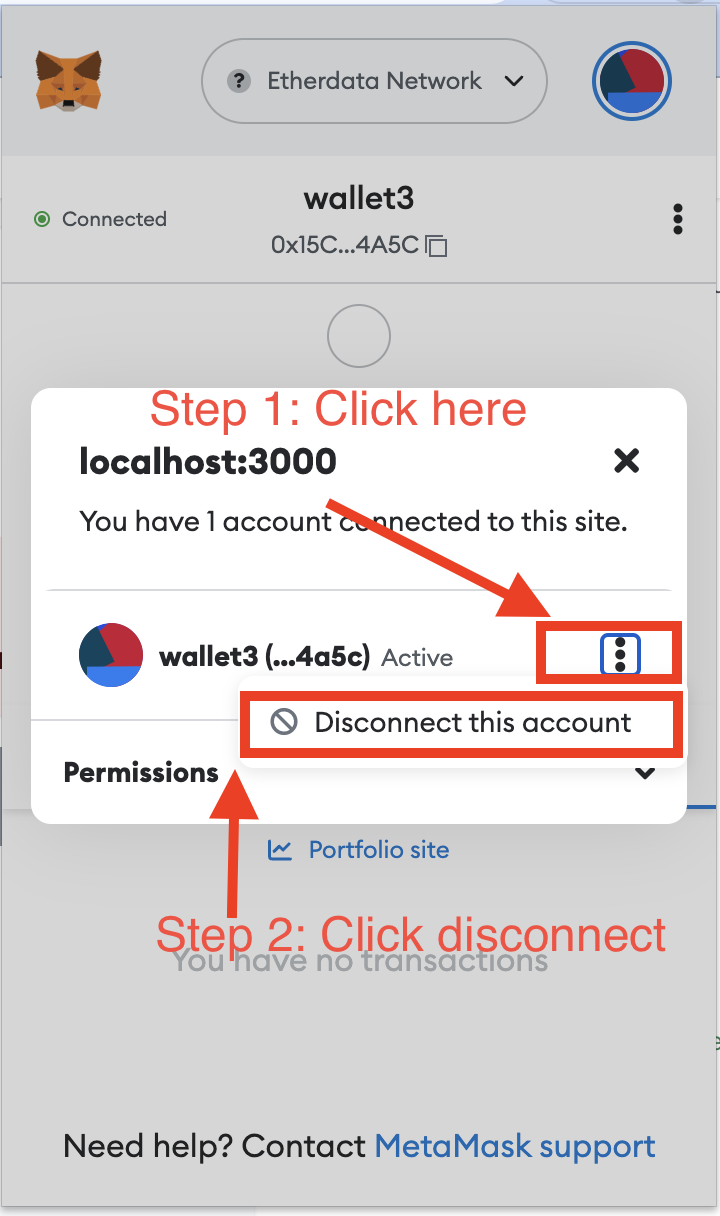
If you have issue with the button not working, make sure you disconnect the metamask before clicking the button.

Add states to the WalletApp
We will bind the states to the UI so that it will be updated when the states are changed.
{signerAddress}will be replaced by the value ofsignerAddressstate. And it will be updated when thesignerAddressstate is changed.{signerBalance}will be replaced by the value ofsignerBalancestate. And it will be updated when thesignerBalancestate is changed.
React states are updated using setState function. We will update the states in the onClick callback.
And now you have a complete wallet app that can connect to MetaMask and display the signer address and balance.
Can you add a progress bar to show the loading state when the button is clicked?